Tuesday, August 19, 2008

How to Limit Daily Desktop Usage in Ubuntu

This is not my script but I'm placing it here for me and my family to reference. It comes from another blog called "Waggle Dance" The link to that bog is posted on the left hand side of this page under "My Links". All credit for the following scripts go to the author of the original timekpr.txt, and to Ubuntu Forums member .nedberg for making the modifications and additional two scripts I requested in this thread.

Here's the original content.

I have been looking for a way to limit the amount of time my kids spend on the computer. After toying with a couple of different things like timeoutd and pam_time, I decided to hack together something to meet my needs:
  1. My kids share a PC with their Mom using fast-user-switching, so I needed it to keep track of multiple sessions.

  2. I needed different times for different users ( Mom wouldn’t be toothrilled with me forcing her to log off after an hour or two )

  3. I wanted everyone to get ample warning so they could save their work and logout cleanly.

With those ideas in mind I came up with this:

timekpr - (Modified - this is not the creator's original version)
What timekpr does is watch for instances of the session manager, keep a running tally of the time they are running, and logs kills it when time is up. Several libnotify alerts let the user know when thier time is running out.


It’s pretty rough right now ( just a couple of hours of research and bash hacking ) but it just kicked my son of the PC after his alloted hour and a half, so it’s functional - YMMV - I need to allow for different time limits on the weekends, and it uses a less than elegant method for
shutting down gnome-session, so it’s very much a work in progress.

Lets make sure you have the notifier libs installed so that you can get the nice graphical notifications that your user is about to be kicked to the curb. Open up a terminal and paste
this:

sudo apt-get install libnotify-bin

To install it, down load the script, timekpr , and rename it. Copy it someplace useful and make it executable:

mv timekpr.txt timekpr.sh
chmod 755 timekpr.sh
sudo mv timekpr.sh /usr/local/bin


Next make a directory for the time tracking files and limits:

sudo mkdir /var/lib/timekpr

I added a line to /etc/rc.local

/usr/local/bin/timekpr.sh &

to start the script after a re-boot.

To limit someone’s per day usage, just add the number of seconds they will be allowed to a file in /var/lib/timekpr

sudo -i
echo 7200 > /var/lib/timekpr/username
where username is the account you want to time limit.

IMPORTANT UPDATE - NEW VERSION

This is a new version and needs a new config file for each userername located at:

/var/lib/timekpr/username

To use the new script, login to a terminal with root permissions and delete the old script AND all the old user configuration files and REBOOT your system. Then install the new script and create all new username config files. Then paste the settings (as shown below) into the newly created confg files. Reboot your system again, and the script should work it's magic provided you have added it to the: /etc/rc.local file as instructed above. If you don't create a configuration file for any user, they will have unrestricted access.

Each of the username files should have the following format:
limit=( 345 345 345 345 170 345 345 )
from=( 7 7 7 7 7 7 7 )
to=( 22 22 22 22 23 22 22 )

Each of the seven numbers on a line stands for the value of that certain day of week

(SUN--MON--TUE--WED--THR--FRI--SAT)

An unrestricted user does not need this file, so don't make one for yourself.

To start the script without rebooting, open up a terminal session and type:
$ bash /usr/local/bin/timekpr.sh


You need to be sure that libnotify is installed. Type the following code in a terminal session.

$ sudo apt-get install libnotify-bin

Here are the scripts
- Notice the 2 extra scripts for added usefulness.

timekpr.txt
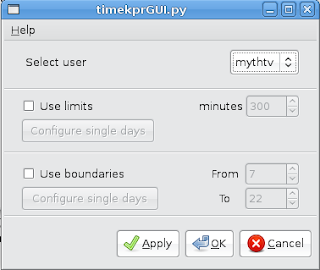
This is a modified version of the original. It lets you set additional time controls that prevent the user from being able to login outside of the allowable limits (7 & 22 by default) of 0700 & 2200 hours.

addtime.txt
This is a "rewards" script to give additional time to your well behaved little users. This script (when ran) is only effective for the day you run it. Run this script in the following format:

sudo addtime.sh
This does not expand the login hours regular boundaries of 0700-2200 hours.

extendlimits.txt
This script will allow you to set user privileges to extend beyond the default login boundaries of 0700 to 2200 hours. This is only effective for one session and will reset when the timekpr.sh script is next executed. To run this script, use the following format:

sudo extendlimits.sh

What's ahead?
.nedberg of the Ubuntu Forums is currently working on a GUI frontend for this script. Here is a preview of the work as it stands.

Saturday, August 16, 2008

Enemy Territory: Wolfenstein - Complete Install Guide for Hardy

Make sure that the driver to your 3D graphics card is properly installed and working by opening up a terminal and typing:

glxgears

Be sure your sourcelist is correctly set and download the relevant libs to Wolfenstein.

sudo aptitude update && sudo aptitude safe-upgrade

sudo aptitude install libc6-i386 libgtk1.2

wget http://www.boundlesssupremacy.com/Cappy/getlibs/getlibs-all.deb

sudo dpkg -i getlibs-all.deb

INSTALLATION:

Open the terminal and type;

cd ~/Desktop

wget -c http://ftp.games.skynet.be/pub/wolfenstein/et-linux-2.60.x86.run

chmod +x et-linux-2.60.x86.run

sudo sh et-linux-2.60.x86.run

NOTE: It's important that you exit the installer window and do not press the installers play button. It will course permission problems for Wolfenstein.

Get any missing dependencies

getlibs /usr/local/games/enemy-territory/et.x86

Build a Launcher in the Games Menu


sudo nano /usr/share/applications/etwolfenstein.desktop

Add the following;

[Desktop Entry]
Name=Enemy Territory: Wolfenstein
Comment=Wolfenstein:
Enemy Territory is an online multi-player game, where the players
interact with each other over a network in two teams (Axis and Allies)
to defend or destroy mission objectives.
Exec=et
Icon=/usr/local/games/enemy-territory/ET.xpm
Terminal=false
Type=Application
Categories=Application;Game;


Then save (ctrl)+(o) and exit (ctrl)+(x)

Wolfenstein: Enemy Territory - no sound fix

The following is information I found by searching the internet for making the sound work in my WolfET installs. I found this information in 2 seperate forum posts and I take no credit for the accuracy of this information.

I have tried this on 3 different systems of mine, and it works on all 3. I have no idea why the commands in the first group do not match the second (i.e. sudo echo... vs sudo sh -c "echo...")

I personally used the 1st group when I tested and found it to work perfectly. The second group was found when I was looking a permanant fix (holds after reboot). I would guess they both do the exact same thing but use a slightly different command.

Older games like Wolf: Enemy Territory and Quake3 do not support ALSA (Advanced Linux Sound Architecture), the older games support OSS (Open Sound System) . The commands below direct the game to use OSS.

For WolfET
As root user (sudo -i) type:
sudo echo "et.x86 0 0 direct" > /proc/asound/card0/pcm0p/oss

For Quake3
As root user (sudo -i) type:
sudo echo "quake3.x86 0 0 direct" > /proc/asound/card0/pcm0p/oss

The commands I posted only effect the games. After I'm done with the game everything else works good like Gaim and Rhythmbox. The commands I posted are only good for that session, after a reboot, I have to re-enter commands.
Try type this on terminal

sudo sh -c "echo 'et.x86 0 0 direct' > /proc/asound/card0/pcm0p/oss"

sudo sh -c "echo 'et.x86 0 0 disable' > /proc/asound/card0/pcm0c/oss"

Then test the game. If sound works, you can apply this fix permanetly by typing in terminal:

sudo gedit /etc/rc.local

and add these lines end of file

echo 'et.x86 0 0 direct' > /proc/asound/card0/pcm0p/oss
echo 'et.x86 0 0 disable' > /proc/asound/card0/pcm0c/oss
exit 0


Friday, August 15, 2008

What is the equivalent of Ctrl-Alt-Del in Ubuntu

Press the Alt+PrntScrn(SysRq) keys and hold them down while you type each of the following keys in order: R-E-I-S-U-B

R switch the keyboard mode
E send all processes the SIGTERM singal
I sends all processes the SIGKILL signal
S Sync filesystem
U Unmount all devices
B reboots the system (typing O instead will turn the computer Off)

Theoretically you could just do Alt+SysRq+B to do an old school, Win 95 style Ctrl+Alt+Del reboot, but it’s just as bad as hitting that power button. Your best bet is to run the whole sequence to ensure that the system shuts down in the way it would normally shut down when you issue a reboot command.

And it’s almost guaranteed to work even on a completely locked up system. That is, if it’s enabled on your system. If you are not sure, do a really quick test right now:

cat /proc/sys/kernel/sysrq

If you see a 1, you are in good shape.
If you see a 0 (zero), you can enable the SysRq keys by doing:

sudo echo 1 > /proc/sys/kernel/sysrq

How to add the source of Ubuntu Tweak

No matter your Ubuntu is Feisty, Gutsy or Hardy, open your terminal, type the command to run gedit(or other editor in your opinion) to modify the sources.list:

sudo gedit /etc/apt/sources.list

And put the two line into it:

deb http://ppa.launchpad.net/tualatrix/ubuntu hardy main
deb-src http://ppa.launchpad.net/tualatrix/ubuntu hardy main

Then update the source and install or upgrade Ubuntu Tweak:

sudo apt-get update
sudo apt-get install ubuntu-tweak

if you have installed, just type:

sudo apt-get dist-upgrade

Thursday, August 14, 2008

Randy - To Fix your refresh rate try this

Okay, I was able to fix this problem by doing this:
Open up a terminal session and paste sudo displayconfig-gtk

then set the screen model to your exact monitor. After doing that, you should be able to change your refresh rate using the System->Preferences->Screen Resolution program.

Also have a look at the ATI links posted in the "My Links" section to the left of this page.

Reconfigure your ATI Driver - Instructions for Ubuntu 8.04 (Hardy)

Enable accelerated the accelerated ATI graphics driver in the restricted-manager, then open a terminal and past the following code:

sudo dpkg-reconfigure -phigh linux-restricted-modules-`uname -r` && sudo insmod /lib/modules/`uname -r`/volatile/fglrx.ko

Log out and log in.

Friday, August 8, 2008

Version Locking Packages and Kernel

COMMAND LINE METHOD:
Locking the version on a package prevents it from being upgraded. I'll show you two ways to do this. The first is to open a terminal and type: sudo aptitude hold linux-image-`uname -r` Those ` are backticks, usually located to the left of the 1/! key.


SYNAPTIC PACKAGE MANAGER METHOD:
For those who prefer to use GUIs, open Synaptic and scroll down to where the packages named linux-image- and then some numbers are. Find the one you are using (probably the highest number), and click Package > Lock Version. Both of these will prevent the kernel from upgrading at all.

OK, now you need to release those holds.
Synaptic, that's no problem. Just un-check it, do the upgrade, then make sure you lock version on the new one. For the command line one do
sudo aptitude unhold linux-image-`uname -r`. Redo all your tweaks of course, and you're good to go.

Wednesday, August 6, 2008

Bonus Check

Today I got a bonus check from my employer, a plaque, a service ribbon, and a letter of commendation. You might say it's been eventful. I'm very appreciative towards my boss for recognition because I've definitely been loyal and a producer of results. It's all about the bottom line, and I'm good at that.

As a result of the bonus check, I'll be taking some time off from work (just a day) and visiting my son who just moved into his new house with my Daughter-in-law and my grand baby Audrey. I can't wait to see them.

I'll also be traveling a route that allows me to visit my parents and siblings, and that will also be great.

That's all I've got for the day. I can't wait for some more great Ubuntu updates and/or bug fixes. Goodnight...

Monday, August 4, 2008

RaLink RT2500 rev 01 speed tweak...

If you have this wireless card and it won't connect at a good speed (mine only connected at 1M) then you will love this tweak. First you have this card. In a terminal session issue the "lspci" command and look for this:

"
01:09.0 Network controller: RaLink RT2500 802.11g Cardbus/mini-PCI (rev 01)"

Next, Check you speed (right click on the connection and choose Connection information). If it says anything less than 54Mb/s, open up /etc/rc.local (as root) and add the following lines:
Code:
ifconfig wlan0 up
iwconfig wlan0 rate 54M
Replace wlan0 with you interface name. Worked for me.

To put in to effect immeadiately, open up a terminl and run:
sudo /etc/init.d/networking restart

Install audio and video codecs in ubuntu

Open up a terminal (applications -> accessories -> terminal) and copy/paste this code:
sudo wget http://www.medibuntu.org/sources.list.d/hardy.list -O /etc/apt/sources.list.d/medibuntu.list && wget -q http://packages.medibuntu.org/medibuntu-key.gpg -O- | sudo apt-key add - && sudo apt-get update && sudo apt-get install -y ubuntu-restricted-extras non-free-codecs w32codecs totem-mozilla libdvdcss2 libdvdnav4 gxine totem-xine xine-ui libdmx1 libxine1 libxine1-ffmpeg libxinerama1 libdvdread3

That’s it.

(if you use 64bit, replace w32codecs with w64codecs)


————–

If you are looking for a better audio player, I suggest either exaile or bmpx.

You now have 99% of the codecs in the world installed on your system.